7 Essential Spring HVAC Maintenance Steps to Prevent $3,000 Repairs
As temperatures rise, the HVAC system emerges as a critical component of home functionality. A modest investment of time in spring maintenance can avert repairs that surpass $3,000 in cost. Homeowners who perform these straightforward DIY tasks ensure optimal efficiency, prolong equipment life, and minimize disruptions during peak cooling periods.
This guide details seven practical steps accessible to every homeowner. Each task requires minimal tools and expense yet yields substantial benefits in reliability and savings. Follow these sequentially for comprehensive system care.
1. Replace or Clean Air Filters
Air filters capture dust, pollen, and debris to safeguard indoor air quality. Clogged filters restrict airflow, compelling the system to strain and elevating energy consumption. Over time, such restrictions lead to coil icing or motor damage, resulting in repairs that accumulate significant expenses.
Steps to Follow:
- Power down the HVAC system at the thermostat and breaker.
- Identify the filter location, typically within the return air duct or furnace housing.
- Extract the filter and note the dimensions indicated on its frame.
- Install a fresh filter, ensuring airflow arrows direct toward the blower.
Additional Guidance: Reusable filters benefit from gentle rinsing under lukewarm water followed by complete air drying prior to reinstallation. Exchange disposable filters every one to three months, adjusting frequency based on household dust, pets, and air quality levels.
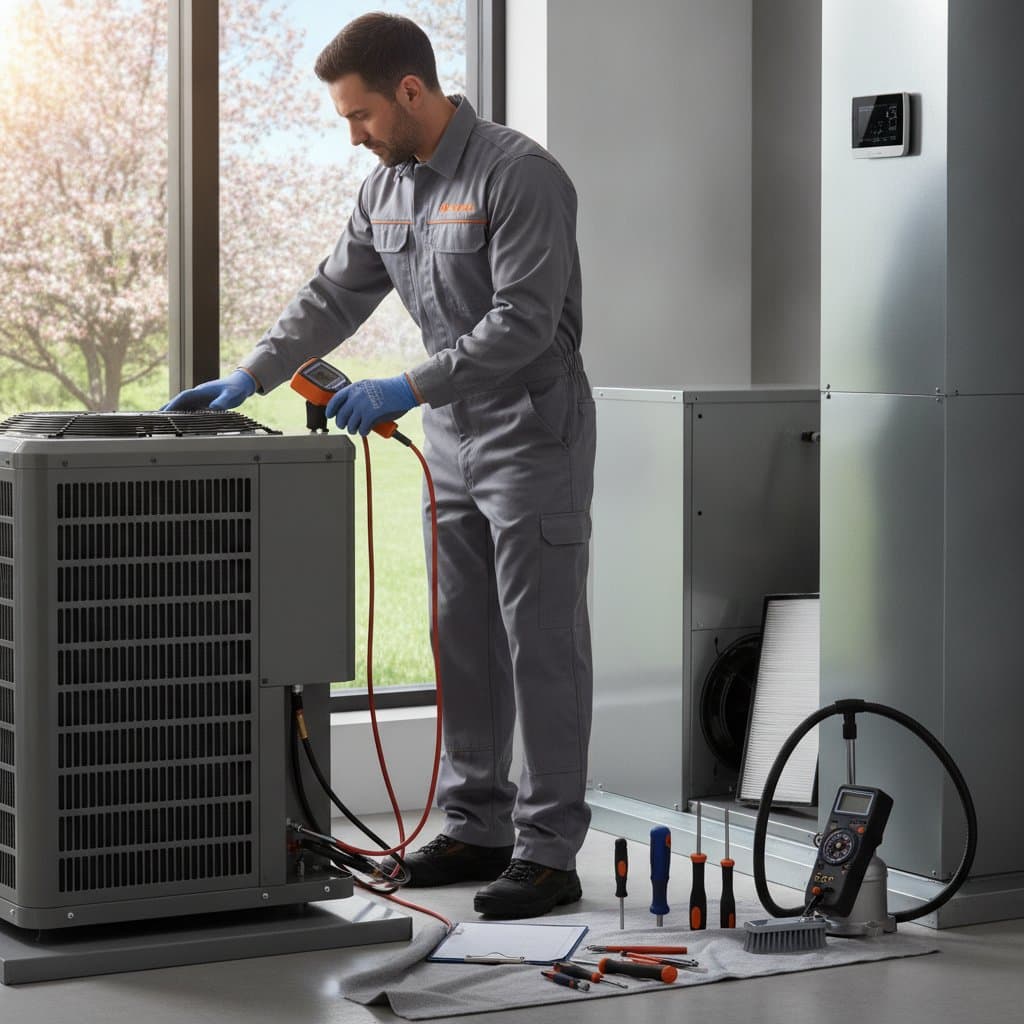
2. Clean the Evaporator Coils
Evaporator coils, situated indoors, absorb heat from the air to facilitate cooling. Accumulated dirt on these coils impairs heat transfer, causing the system to overheat and potentially fail prematurely. Neglect here often precipitates compressor strain, a repair that can exceed $2,000.
Steps to Follow:
- Shut off power to the unit for safety.
- Access the coils behind the air handler or furnace panel.
- Use a soft brush to dislodge surface dirt, avoiding sharp tools that might bend fins.
- Apply a manufacturer-approved no-rinse coil cleaner and allow it to evaporate.
Additional Guidance: Perform this task annually in spring, but consult a professional if coils appear heavily soiled or inaccessible. Proper cleaning restores efficiency and prevents energy waste from reduced cooling capacity.
3. Clear Debris Around the Outdoor Unit
The outdoor condenser unit expels heat to maintain system balance. Debris such as leaves or overgrown vegetation blocks airflow, forcing the compressor to labor excessively and risk burnout. Such obstructions contribute to failures that demand costly component replacements.
Steps to Follow:
- Preserve a minimum two-foot clearance on all sides of the unit.
- Prune adjacent bushes, grass, and shrubs to avoid contact.
- Sweep away leaves, twigs, or litter from the unit's surface and base.
- Install a fine mesh screen overhead if positioned beneath trees to intercept falling matter without impeding ventilation.
Additional Guidance: This maintenance requires no cost beyond basic tools and prevents thousands in potential repairs to fans or compressors. Inspect monthly during growing seasons to sustain unobstructed operation.
4. Clear the Condensate Drain Lines
Condensate drain lines remove moisture generated during cooling to avert water damage. Blockages from algae or debris cause overflows, leading to mold growth or electrical shorts. Unaddressed clogs often necessitate evaporator coil or pump repairs approaching $1,500.
Steps to Follow:
- Locate the drain line, usually a PVC pipe exiting the indoor unit.
- Disconnect the line at the access point if equipped.
- Flush the line with a mixture of one part white vinegar to ten parts water using a wet-dry vacuum or pour method.
- Reconnect and test by running the system briefly to verify drainage.
Additional Guidance: Repeat this procedure every three months in humid climates. If flushing fails to resolve issues, professional intervention ensures thorough clearing without risking system components.
5. Test and Calibrate the Thermostat
The thermostat regulates system cycles to match comfort needs. Inaccurate calibration prompts excessive runtime, accelerating wear on motors and compressors. Faulty operation inflates utility bills and shortens overall equipment lifespan.
Steps to Follow:
- Adjust the setting several degrees below ambient temperature and verify the system activates.
- Raise it above room temperature and confirm shutdown occurs promptly.
- Replace batteries if the display fades or the unit responds sluggishly.
Additional Guidance: Opt for programmable or smart thermostats to automate adjustments during absences, reducing cycles and energy use. Calibration verifies precise control, essential for preventing strain-related failures.
6. Inspect Electrical Connections and Components
Secure electrical connections power the HVAC reliably. Loose wires or corroded terminals spark inefficiencies or hazards like tripped breakers. Early detection averts motor or capacitor failures, which rank among the priciest repairs at over $1,000 each.
Steps to Follow:
- De-energize the system completely.
- Examine visible wiring at the thermostat, furnace, and outdoor unit for frays or looseness.
- Tighten terminals with a screwdriver if accessible, but avoid if unfamiliar with electrical work.
- Check the capacitor for bulging or leaks, noting any anomalies for professional review.
Additional Guidance: Limit inspections to visual checks unless experienced; otherwise, schedule a technician. Annual reviews maintain safety and performance, reducing downtime risks.
7. Monitor System Performance for Early Warnings
Vigilant observation identifies issues before they escalate. Unusual noises, scents, or outputs signal underlying problems like refrigerant loss or part degradation. Prompt attention to these indicators preserves the system and avoids emergency interventions.
Indicators to Monitor:
- Rattling or buzzing suggests loose components or debris.
- Grinding or squealing indicates bearing or belt wear.
- Short cycling points to airflow restrictions or refrigerant imbalances.
- Warm air output signals compressor or refrigerant concerns.
- Odd odors may stem from mold, electrical faults, or accumulated dust.
Additional Guidance: Power off the unit immediately upon detecting symptoms and engage a licensed technician. Routine monitoring empowers homeowners to act decisively, safeguarding investments.
Schedule Professional Inspections When Needed
While DIY efforts address routine care, certain diagnostics demand expert handling. Engage a certified technician for comprehensive evaluations if the system exhibits uneven performance, persistent noises, or electrical faults. Professionals assess refrigerant charges, electrical integrity, and load capacities to uphold safety and warranties.
Indicators for professional service include weak airflow post-filter replacement, frost on coils, or frequent breaker trips. Such interventions detect hidden issues early, preventing minor concerns from evolving into major, expensive overhauls. Annual tune-ups complement DIY steps for peak reliability.
Frequently Asked Questions About Spring HVAC Maintenance
How often should air filters be replaced or cleaned?
Disposable filters require replacement every one to three months, influenced by dust accumulation, pets, and air quality. Clean reusable filters monthly during intensive use to sustain airflow.
Do dirty evaporator coils lead to substantial damage?
Affirmative. Soiled coils hinder heat absorption, elevating compressor pressure and hastening failure, a repair often exceeding $2,000.
What thermostat setting optimizes spring comfort?
Set to 74-76 degrees Fahrenheit for balanced cooling. Increase by 4-7 degrees during absences to conserve energy while preserving comfort.
How do smart thermostats contribute to repair prevention?
These devices optimize cycles through scheduled adjustments, alleviating component stress and extending service life.
Is outdoor unit clearance truly essential?
Yes. Adequate space prevents overheating and inefficiency, averting compressor failures that cost thousands.
Apply These Steps for Reliable Cooling All Season
Incorporate these maintenance practices into your spring routine to fortify HVAC performance. Consistent care translates to fewer surprises, lower bills, and sustained comfort. Your proactive approach ensures the system delivers efficiently when demand peaks.